Wednesday, December 7, 2011

Cricut Cardz Challenge #97

It's time for the next challenge over at Cardz TV for the Cricut Cardz challenge. This challenge was to make a card using any cartridge using your favorite Christmas carol. Mine is 'Oh Christmas Tree' so I used the tree from create a critter. I used a standard card base and added two layers beneath the tree. I used twine from The Twinery to wrap around to look like garland. The stamp is from My Creative Time in her All Around Christmas set. Be sure to check out the other members of the design team over at www.cardztv.blogspot.com.

Wednesday, November 23, 2011

Cricut Cardz Challenge #96

It's that time again, for another Cricut Cardz Challenge.  This time it was to make a Christmas card with a cut that started with the letter "S".  I decided to veer away from "Santa" and go with a "Snowflake".  The snowflakes were cut from the Winter Lace cartridge, with the large one at 2 1/4" and the two smaller ones at 1 3/4 inches.  I used some twine from The Twinery to make it appear that they were hanging. I used the stamp "Snowmany Hugs" from a set of stamps from Emma over at My Creative Time called Mixed Holiday Sentiments. I stamped it on using Tim Holtz Distress Embossing Ink and Perfect Pearls.

Wednesday, November 9, 2011

Cricut Cardz Challenge #95

CRICUT CARDZ CHALLENGE #95

Mary over at CardzTV is having another challenge. This time it is "We're So Thankful". It is to make a Thanksgiving card using any cartridge and colors you want.  I used the Create-A-Critter cartridge to make the turkey.  It's on a standard A2 size card, with the black layer cut at 5 1/4 x 4, and the white cut at 5 x 3 3/4. I used some ribbon I had and stamps from Peachy Keen stamps for the leaves and the "Happy Harvest" stamp. The turkey is on an action wobble.  Feel free to come play along!

Wednesday, September 28, 2011

Cricut Cardz Challenge #92

Hello, and welcome to another Cricut Cardz Challenge #92.  This challenge is to use an owl from any cartridge and make a halloween card using any colors.  I have chosen the owl from the Sentimentals cartridge.  I used kraft cardstock to make a standard A2 size card, inked the edges of everything with Vintage Photo Distress Ink, and dug the Perfect Pearls out of my drawer to use for the first time.  I used the stamp set "Build A Banner" from My Creative Time to create the polka dot background using the fall "Seedless Preserves" Distress Ink from Tim Holtz.  I then dusted it with the white Perfect Pearls to give it the glitter effect.  I love how it turned out, and I'm gonna have to play more with the Perfect Pearls.  I used a brand new stamp set from Peachy Keen Stamps called "Faceless Fall Fun" and tweeked the Happy Halloween to say the Happy Owloween.  I also used the Critter Faces for the eyes on the owl, and for the saying, I used the Stitched Circle and Scallop die from My Creative Time.  Head on over to http://www.cardztv.blogspot.com/ to see what everyone else put together.

Head on over and link up your project to be entered to win some fun stuff.  And don't forget, when I reach 100 followers, there will be a giveaway on my blog.

Thanks for looking.  Christy

Wednesday, September 14, 2011

Cricut Cardz Challenge #91

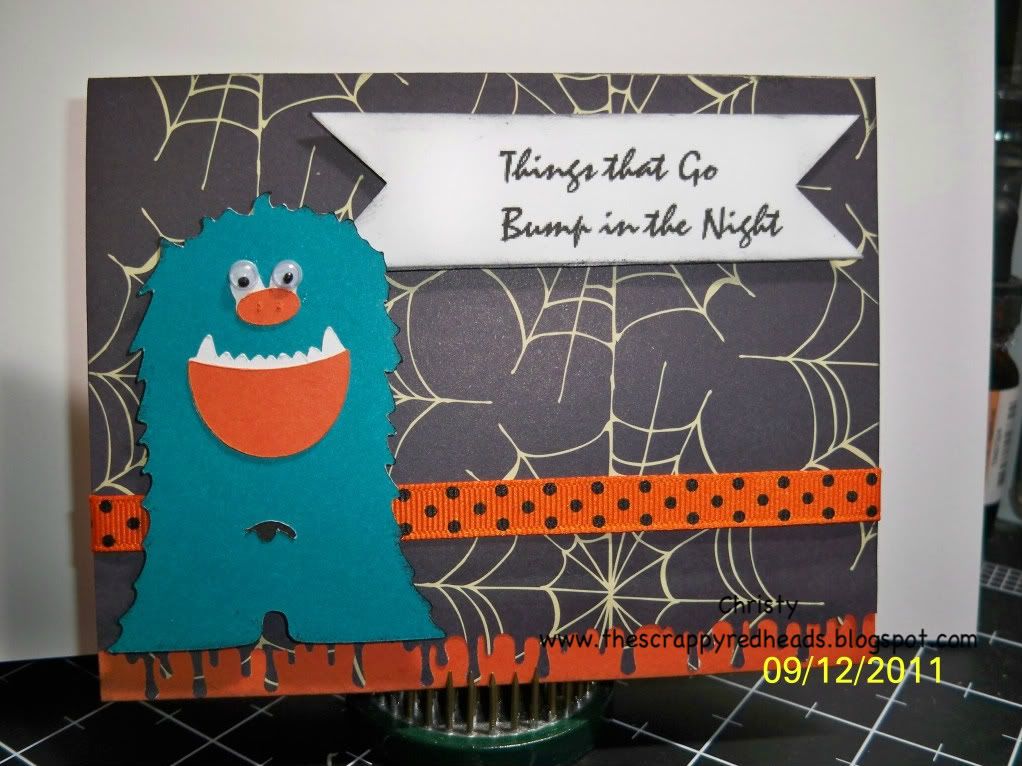
Today's card will be a post for the Cricut Cardz Challenge #91 over at Cardz TV.  Mary has been gracious enough to add me to the wonderful design team over there, and after you have a look around here, hop on over to www.cardztv.blogspot.com to see what Mary and the rest of the design team have in store.
I used the Halloween paper stack from Walmart, my Martha Stewart Drippy Goo punch, ribbon from Michaels, and the monster was cut from "Bump In The Night" at 3 inches. I gave it googly eyes to make it a little more scary!
Be sure to become a follower and grab my blog button to display on your own blog! I will be having a giveaway when I hit 100 followers.

Christy


Tuesday, September 6, 2011

New Design/New Blinkie!!!!

I'm so happy that I found someone who could design my blog and make it look GREAT!!! Thanks to Faith over at Faithfulecreations.com, I was able to have a blog that looked MUCH better than what I originally put together.  She is awesome! I finally have a blinkie, so please become a follower if you are not, grab my blinkie, and when I reach 100 followers, I will have a giveaway.  Please refer your friends!
Christy a/k/a one of the Scrappy Redheads :)

Monday, September 5, 2011

My Creative Time Throwback Thursday Challenge

This throwback thursday challenge was to make a "cricutless" project and include the colors of purple, orange, green and black. I decided to make my fun spinner card and use Emma's stitched circle and scallop die.

Saturday, August 20, 2011

Cricut stand

My husband built me a stand to put my cricuts together. My scrapping area is only a 6 foot wall in our living room so every inch counts.

Wednesday, August 17, 2011

Throwback Thursday Entry

The Throwback Thursday challenge was to use a retired cartridge to create a project.  I decided to use Tags, Bags, Boxes and More to create a matchbox big enough to fit a gift card in.  I used my scallop-scallop punch for the wrapper and the Scallop & Stitched Circle dies from My Creative Time, along with the stamps from "All Around Christmas".  I would have done this sooner and probably made it look better, but we had birthdays this weekend and I didn't have time to do it before now.

Tuesday, August 9, 2011

Finally, my first YouTube Video (Spinner Card Tutorial)

I have just made and uploaded my very first YouTube video, with the Spinner Card tutorial.  As I've never done a video on YouTube before, I was nervous, so please bare with me, I will surely get better (I hope!) .  Hopefully the video will show here, but if it doesn't, head over to my YouTube channel (cdbugh).


Thanks again for your patience, and enjoy!

Christy

Sunday, August 7, 2011

Update

I want to say a big "Thank You" to Mary at Cardz TV for the wonderful compliments she gave me on the card I sent her. I know I have received several new followers due to her introduction, want to welcome all of you, and I will try to post a new project shortly.  I am also attempting to make my first YouTube video, and will do a tutorial for the spinner card that I sent to her, so look for that soon.

Thanks,
Christy

Wednesday, July 27, 2011

Yet Another Spinner Card

I decided to send a card to Mary over at Cardz TV for her "Coffee & Cardz", so I may a spinner card for her.  I just got the newest stamps and dies from Emma at My Creative Time and used the new scallop and stitched circle die to make the the "flower".  I used my Peachy Keen Stamps "Wide Eyed Kids" stamp for the the face and used Glossy Accents for the eyes. I used My Creative Time stamps for all of the sentiments, and embossed the sentiment on the curly label.  I love making these cards and they are so easy.

Friday, July 8, 2011

Anniversary Card

I know I don't usually do more than one post a week, much less more than one in one day. My husband's aunt and uncle are celebrating their 50th wedding anniversary, so I thought I would make them a card. The card is an easel card, and to be honest, I had made the base so long ago that I forgot the measurements and demensions. The paper is from a DCWV stack with "Linens" in the title. I decorated it very simply by using the My Creative Time Curly Label Die and corresponding stamp from the Inspiring Words Accents set. The sentiment is from the You Had Me At Chocolate stamp set. I also used some Papertrey Ink ribbon, and two paper flowers with a brad. The interior sentiment doesn't show up well on camera, but is from the Encouraging Quotes stamp set. I love these stamps!

Tacky Tuesday Challenge #8

I decided to try to make a goal to enter as many challenges as my time will allow for.  The challenge was to make something with a "cool" treat and have the word "sweet" in the sentiment.

Here's my entry:
I made a stairstep card, which I learned from Carolanne at Loganscraftymamma.  I used the My Creative Time Curly Label die for the sentiment, along with the Inspiring Words Accents stamp set for the corresponding label stamp.  The sentiment was from two stamps from the "This & That" stamp set from My Creative Time as well.  The banana split was cut from the Yummy Cricut Imagine cartridge at 4 inches.

Thursday, July 7, 2011

Get Well Card/Entry for MCT Throwback Thursday

I made this card to enter it into the My Creative Time "Throwback Thursday" challenge. the challenge was to use the "Wild Card" or "Just Because" cartridge, and add some kind of embossing to it. I decided to use the bandaid from the Wild Card cartridge.  I used my Imagine to print and cut the image which was cut at 7".  It made for a long card, but still cute.

I used the new "Curly Label" die from My Creative Time, stamped the label from the "Inspiring Words Accents" and used the phrase from her "Pain, Pain, Go Away" stamp set.  I heat embossed the label (which may not show up good because I used a pearly white) and used my Cuttlebug Swiss Dots folder to do the two ends of the bandaid.  I decided to add some ribbon, because it looked like the left side of the card was missing something.

Saturday, July 2, 2011

Hello kitty birthday card

My daughter wanted to make a birthday card for her cousin who turns 9 on July 3rd. She picked the cut from the Hello Kitty cartridge. She also adorned it herself with the long deminsional up in the corner.  She wanted that to be her "special touch".  It was cut at 2.5 inches. I assembled it just like the other spinner cards on my blog. I also used the Happy Happy Birthday stamp from My Creative Time's "Wow So Many Candles" set.  Hope you like it.

Wednesday, June 22, 2011

Scrappin' Chics Guest Designer-Third and Final Post

Welcome back to my third and final post as a Guest Designer for the Scrappin' Chics Challenge Blog. I want to thank Jen and Kimmarie for giving me the opportunity to serve as a Guest Designer.  The whole design team is amazing and there are many wonderful projects over there for you to view.  Don't forget to become a follower on my blog, if you aren't already.  When I hit 100, I will have my first giveaway. Be sure to mention it to your friends.  Now on to the project:


I decided to venture out and make a "waterfall" card for this post.  I got the instructions from YouTube.  I have never made one before, but it actually turned out cute, at least I thought for a first attempt.  It is a standard A2 size card, a 4 x 5 1/4 green mat, a strip of paper 4 x 3/4" with 2 brads, four squares cut at 2 inches and 4 squares cut at 1 3/4 inches, a strip of white paper cut at 9 x 2 scored at 2, 2 3/4, 3 1/2, and 4 1/4 inches.  You layer your 2 inches squares on each score mark and the long piece goes to the back. I used a combination of dollar stamps from Michaels and a sunshine stamp set from 2001 from Stampin' Up.  I attached the 9 inch strip with a piece of sticky tape on the front side of the 4 inch piece to hold it while the card flips.  I will try to do a YouTube tutorial on this soon.  I hope you liked this post, and thanks again to Jen and Kimmarie for allowing me the opportunity to share!
Christy

Wednesday, June 15, 2011

Scrappin' Chics Guest Designer-Second Post

Welcome to the second post as one of this month's Guest Designers over at the Scrappin' Chics Challenge Blog.  After you've had a look at my entry, hop on over to the blog and give the rest of the designers some love.  For the link, look to the right of this post for the blog button.
Here is my entry:

My card for this entry was inspired by one of the background papers from the Imagine Cartridge "Hopscotch".  At the time I didn't have the Imagine or the cartridge, so I decided to make my own from cloud images temporarily adhered to the paper, some Tim Holtz Distress Ink (Tumbled Glass) and the blending tool.  I used a scrap for the green grass and the cat, flower and butterfly were cut at 2.5"  from the "Kate's ABCs" and the sun was cut at 1.5" from "Simply Charmed".  The sentiment was from the "Designer's Choice" stamp set from Scrappy Mom's stamps.


I hope you enjoyed this week's entry and stay tuned for more!.  Don't forget to go to the Challenge Blog and look at everyone else's entry, and try it for yourself.  Who knows, you might win...

Scrappin' Chics June Design Team Project #2

If you came to my blog to look at the details for my second post as Guest Designer, please check back later in the day, as I was running late and didn't have time to post it this morning from home, and I forgot to bring my memory card to work with me.  It will be on my blog by tonight.

If you are not a follower of my blog, please become one!  I will posting more fun things as the year goes on, and when I reach 100 followers, I will have my first "giveaway".

Thanks and enjoy.
Christy

Sunday, June 12, 2011

Mom's Birthday Card & Entry for My Creative Time Throwback Thursday


I made this "Twisted Easel" card after watching the video from Mary at Cardz TV. It was fun to make and pretty easy.  I am entering this in the My Creative Time Throwback Thursday challenge, which was to use a Circut Lite cartridge and bling.  for this card I used the cartridges "Bloom" and "Lacy Labels".  I cut the tulib at 3.5 inches (cutting off the bottom of the stem), and I cut the labels behind it at 4 and 3.5 inches.  I used my Imagine to fill in the background labels using the Kate's Kitchen and Imagine More Cards cartridges.  The sentiments are from th My Creative Time set called "Wow, So Many Candles".  I used red stickles on the tulip and the green stickles for the leaves. The ribbon is from Hobby Lobby.

Wednesday, June 1, 2011

Scrappin' Chics Challenge Blog June Entry #1

For the first entry as one of the June Guest Designers for the Scrappin' Chics, the challenge during the month is to incorporate sunshine and an inspirational quote into something.  I decided to venture away from my standard "card-making" and do a picture frame as a gift for a recent high school graduate. She happened to be my daughter's kindergarten cadet teacher this year. 
 The sun came from Doodlecharms and was cut at I believe 2 1/2" and I used the "Wide Eyed Kids" face from Peachy Keen Stamps.  The picture frame was a $1 frame from Michaels, which I used the "crackle" technique I learned on YouTube.  I first saw a video made by Carolanne of "Logans Crafty Momma".  You paint with the lighter color on the first layer, let that dry, put a coat of Elmer's Glue-All glue over that until tacky, then put the darker color on top.  When that is dry, take a heat gun over it til it crackles, and then Mod Podge it to protect it.  It's really neat and easy to do.
 The graduation cap was cut from A Child's Year (i'm pretty sure, but I didn't save it on my Gypsy).  I used the stamp set "Follow Your Dreams" from Emma over at My Creative Time.  I used white embossing powder and also put stickles on the tassle of the cap.
If you have any questions about today's project, let me know and I would be happy to answer them.
I would really love for you to become a follower if you are new to my blog.  Thanks for looking.
Christy

Monday, May 30, 2011

Graduation Cards

I know it's been awhile since I posted any new projects. I've done a few but will post one as a Guest Designer on Wednesday. Be sure to check back then for that one.  On to this one...

I made a few graduation cards for the open houses that I have been invited to. It seems 3 of the girls I work with have a kid graduating this year, and the cadet teacher for my daughter's kindergarten class is also graduating.  I used the Everyday Paper Dolls on these cards, and the two cards that are "Americana" looking, I used the K & Co stack (not sure of the name at the moment) that has the stars and stripes on the front.  That particular high school's nickname is the "Stars" and their colors are... you guessed it, red, and blue.  The stamps were from Emma over at My Creative Time. The set is called "Follow Your Dreams". If you haven't checked her out before, she has some very awesome stamps. You can find her at www.creativetimeforme.com


Monday, May 2, 2011

Teacher Appreciation Day


I decided since tomorrow is National Teacher Appreciation Day, I would make these cards for my daughter's kindergarten teacher, teacher's aide, reading teacher and the current substitute since her regular teacher is out having surgery. I completely scraplifted this card idea from Emma at My Creative Time.  I cut the apple from Create-A-Critter at 5", and the worm from the same cartridge at 2.5" and hid the face cut out on my Gypsy. I used Peachy Keen stamps for the face on the worm, and My Creative Time "My Teacher Rocks!" stamps for the note on the front and the sentiment on the inside.

Sunday, May 1, 2011

Happy Anniversary

Our 13 year wedding anniversary is on Monday, May 2. I decided to make my hubby an anniversary card, but he doesn't like sappy or girly cards. I made this one VERY simple, using the Guy Stack from DCWV and the Happy Anniverary stamp from My Creative Time's "My One and Only" set. I inked all the edges to make it look aged. Hope he likes it.

Saturday, April 23, 2011

Cardz TV Mother's Day Challenge Entry

I decided to make this card (alot like the previous one on my blog) for my mother-in-law.  I made it to correspond with the colors that Mary announced on the Mother's Day challenge for Cardz TV to try to win the Cricut Lite Bloom cartridge.  The flower is cut from the Freshly Picked cartridge at 3".  I wrapped the twine/yarn around the bottom of the pot and threaded it through a button and tied a bow.  The stamp is from the My Creative Time set "Mom You Rock" and the ribbon is from Papertrey Ink.  The challenge was to use blue, purple, green and white.  Hope you enjoy!

Saturday, April 16, 2011

"Spinner" Birthday Card

I'm really loving making these spinner cards. This is the second one (as soon as I figure out how would be best to set up my camcorder on my desk, I will make a video.).  This one was made for my mom's boyfriend, who watched me make the first one, and requested one for his birthday with a cat. I cut the cat from "A Child's Year" at 2 inches. I used the Peachy Keen "Everyday Character Faces" in the 3/8" for the face.  The card is actually a standard A2 size card out of kraft cardstock.  The first layer was cut at the same size (4 1/4 x 5 1/2) in the plaid from the DCWV "Guy Stack", the next (red layer) was cut at 4 x 5 1/4 from the same card stack, and the plaid was cut yet again twice at 2 1/2 x 5. All paper edges were sponged with Tim Holtz Walnut Stain Distress Ink.  The bottom one was adhered to the card, and then the "Wishing You" was stamped in the window, while the rest of that particular stamp "the Best Birthday Ever" was stamped on the bottom of the top layer. That stamp is from My Creative Time "Wow! So Many Candles"  I then stamped the birthday border from the My Creative Time "Fun Borders" stamp with Versamark and embossed with gold embossing powder. I added white stitching with my Gelly Roll pen and the card was done. 
Hope you enjoy!
Christy

Thursday, April 14, 2011

Mother's Day Card

This is the Mother's Day card that I have made for my mom to give her this Mother's Day. I used a standard A2 size card, pink layer cut at 4 x 5 1/4, green layer cut at 3 3/4 x 5 and ran through the flower Cuttlebug folder that came with my new Cuttlebug and Papertrey Ink saddlestitch ribbon. The violet is from the Freshly Picked cartridge and I used purple Stickles to make the petals flashy. The sentiment is from the My Creative Times set "Mom You Rock".  I absolutely adore these stamps!
!

The inside of the card is just simply layered and the "Happy Mother's Day" sentiment is from the same stamp set.  Hope you enjoy!
Christy

Saturday, April 9, 2011

Thinking of You Card/Club Ruby Challenge & My Creative Time Entry

This card is a standard A2 size card, the pink paper is from Michaels cut at 1 1/2 x 5 1/2, the diamond/argyle paper is from a DCWV stack cut at 3 x 4 1/2, the purple label is cut from a Nestability and run through the Devine Swirls Cuttlebug folder, the bunny is from the Peachy Keen Easter Patch set, and the sentiment "Thinking of You and Smiling" is from one of the latest releases from My Creative Time, Just a Note to Say.

Sunday, March 27, 2011

Spring Spinner Card

After watching YouTube videos, I saw instructions on how to make this adorable card using a Stampin' Up Word Window Punch. 
Recipe:
Standard A2 size card out of Recollections Kraft Cardstock
purple layer cut at 4 x 5 1/4
pink layer cut at 3 3/4 x 5
white layer for stamping cut at 1 x 5
white layer used for cut out cut at 2 1/2 x 5
Flower from Create-A-Critter cut at 1.75"
ribbon from Michael's dollar bin
2 pennies
Dimensionals from Stampin' Up and Michaels
stamps from My Creative Time (the Live, Laugh is from Paper Princess and the Love is from the You Had Me at Chocolate)
stamp of face from Peachy Keen Stamps Wide Eyed Kids assortment
This card was easy to make and adorable to play with.  I could sit and play with it forever!  I will try to do a video on it and post it as my very first YouTube video! Enjoy!

Saturday, February 26, 2011

Get Whale Soon Card

This is one of the first cards I used "My Pink Stamper" stamps on. I cut the whale from one of my favorite cartridges, Create-A-Critter and used a standard white A2 size card base with brown Recollections paper from Michaels.  Check back for more cards shortly. Thanks for looking!
Christy